Need to take a screenshot on your Windows PC? Whether you want to capture the full screen, a single window, or just a specific area, there are several quick and easy ways to take screenshots in Windows 10, Windows 11, and Windows 8. This guide will teach you how to use keyboard shortcuts (including the Print Screen key), the Snipping Tool, and the Xbox Game Bar to screen capture any part of your Windows desktop.
Taking a Screenshot in Windows
Full Screen Capture: Press the Windows + Print Screen keys simultaneously to capture the entire screen. You can find the image in the Screenshots folder inside the Pictures folder.
Partial Screen Capture: To screenshot just a specific area of the screen, press Windows Key + Shift + S to use the Snipping Tool.
Method 1: Take a Quick Full Screen Screenshot
- Prepare Your Screen:
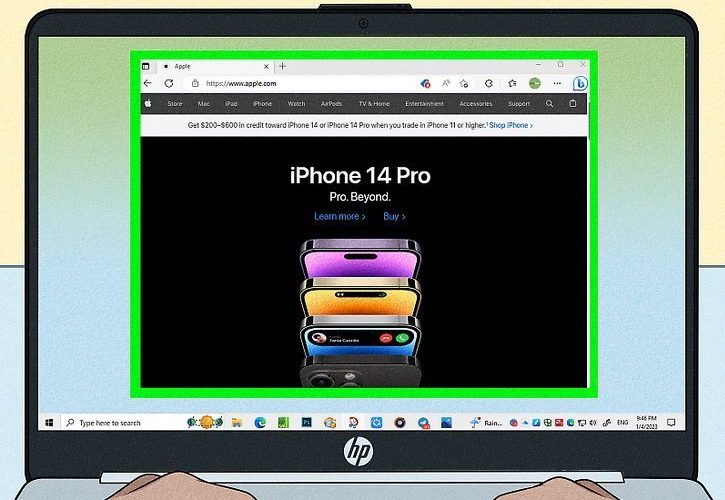
- Go to the screen you want to capture. Ensure that any windows you don’t want in the screenshot are closed since capturing the entire screen will include everything that’s open.
- This method will quickly capture everything on your screen and save the image to your PC. Once saved, you can edit or share it with anyone.
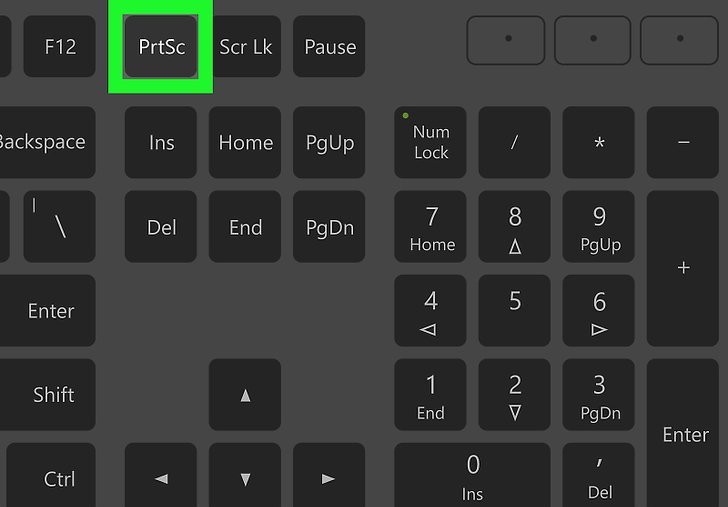
- Find the Print Screen Key:
- Locate the ⎙ Print Screen key on your keyboard. This key is often found on the upper-right side of the keyboard, not counting the numeric keypad. It might be abbreviated as “PrtSc” or something similar.
- If your keyboard doesn’t have a Print Screen key, use the Snipping Tool in Windows 10 or Windows 11.
- Capture Your Screen:
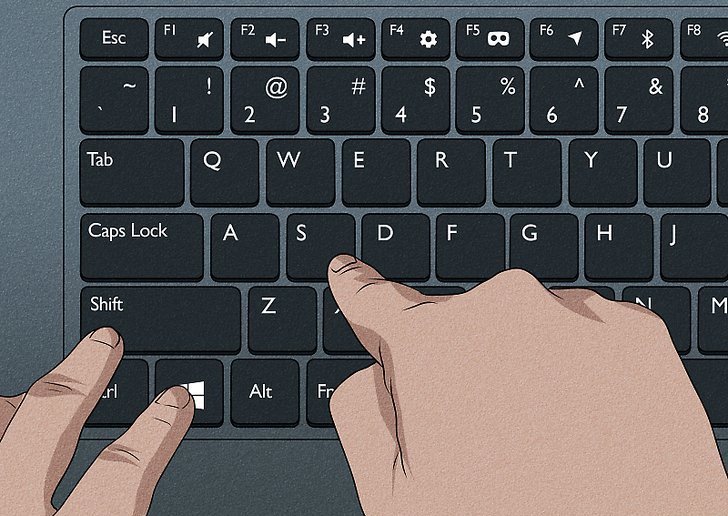
- Instantly Save the Screenshot: Press the Windows key and the PrtSc keys simultaneously. This saves your screenshot as a PNG file in the Screenshots folder within your Pictures folder. On most keyboards, the Windows key is located in the bottom left corner on the same row as the spacebar. The screen may dim briefly to indicate that the screenshot was captured.
- Copy the Screenshot to Clipboard: Press the Print Screen key alone to copy the screen to your PC’s clipboard. You can then paste the copied screenshot into a document, email, or social media post by right-clicking the desired location and selecting Paste.
- On some Windows laptops, you will need to hold down the Fn key as you press the Print Screen key.
- Locate the Screenshot:
- If you used Windows key + Print Screen to capture the screenshot, follow these steps to find the file:
- Open File Explorer by pressing Windows key + E.
- If you see a folder called Pictures in the left panel, click it. If not, click This PC, then double-click the Pictures folder.
- Double-click the Screenshots folder.
- Each screenshot you take is labeled “Screenshot (number).” Depending on your version of Windows, the file name will either end with a number corresponding to the number of screenshots you’ve taken or the date and time the screenshot was captured.
- If you can’t find your screenshot, try using the Snipping Tool instead.
- If you used Windows key + Print Screen to capture the screenshot, follow these steps to find the file:
Method 2: Take a One-Window Screenshot
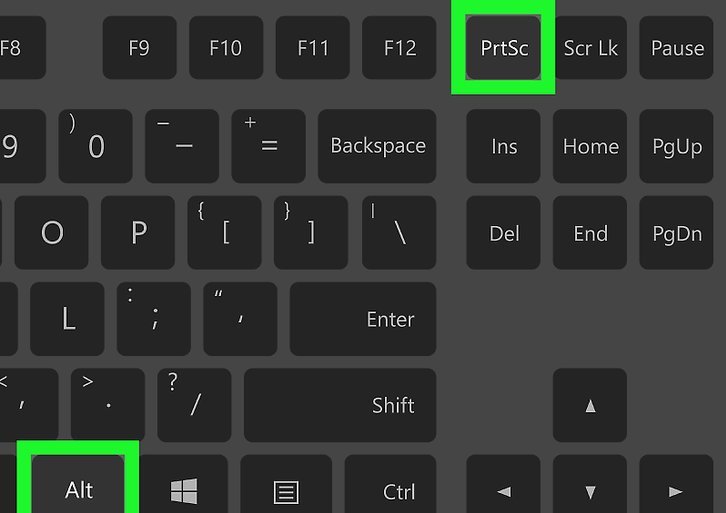
- Select the Window:
- Click the window you want to capture. Make sure the window is in front of all other windows.
- Capture the Window:
- Hold down Alt and press ⎙ PrtScr. This copies an image of the window to the clipboard. On some Windows keyboards, you will need to also hold down the Fn key when using the Print Screen key.
- Open Paint and Paste the Screenshot:
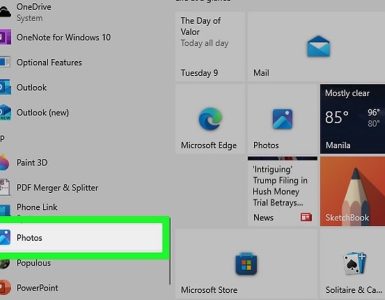
- Open Paint by pressing the Windows key and typing “paint,” then click Paint.
- Press Ctrl + V to paste the screenshot. You will now see your one-window screenshot in the Paint window. You can also paste the screenshot into other programs like Word or the body of an email by opening the program and pressing Ctrl + V.
- Save the Screenshot:
- Click File, then Save. Enter a file name, select a location, and click Save.
- You can change the screenshot’s file type by clicking the “Save as type” drop-down box at the bottom of the window and selecting a different format (e.g., JPEG).
Method 3: Use Snipping Tool (Windows 11)
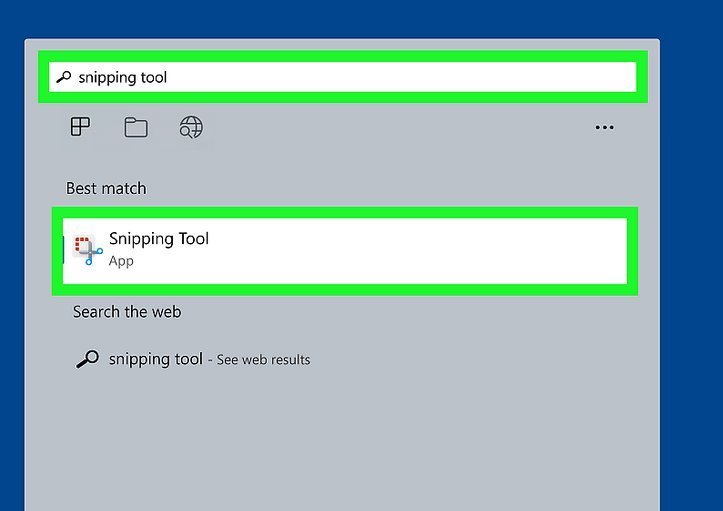
- Open the Snipping Tool:
- Press the Windows key, type “snip,” and click Snipping Tool.
- Select a Screenshot Mode:
- Click the Snipping Mode menu (the square with a plus (+) at its bottom-right corner) and choose an option:
- Rectangle: Capture any part of the screen by drawing a rectangle.
- Window: Capture an individual window.
- Full screen: Capture everything on the screen.
- Freeform: Draw any shape around an area of the screen to capture.
- Click the Snipping Mode menu (the square with a plus (+) at its bottom-right corner) and choose an option:
- Capture Your Screenshot:
- Click + New at the top-left corner of Snipping Tool.
- In Rectangle mode, click and drag a rectangle around the desired area.
- In Window mode, click the window you want to capture.
- In Full screen mode, the entire screen will be captured.
- In Freeform mode, draw an outline around the part of the screen you want to capture.
- You can delay the screenshot capture by a few seconds using the stopwatch menu.
- View and Edit Your Screenshot:
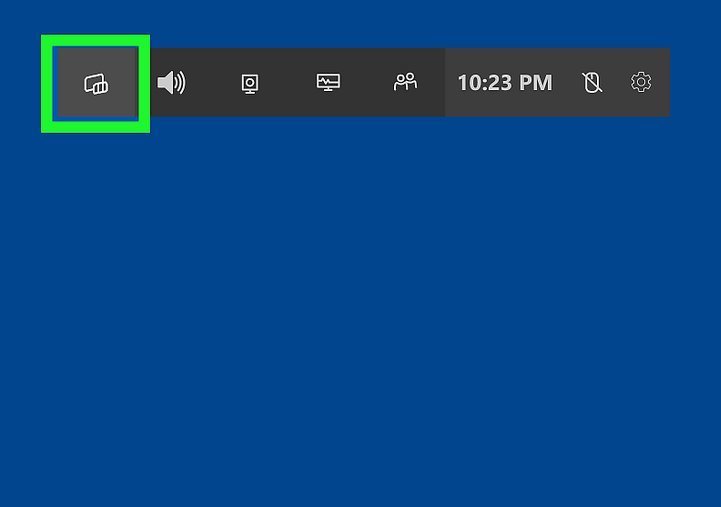
- Click the Snipping Tool icon in the taskbar to view your screenshot. A preview should appear. If not, click the scissors in the toolbar.
- Use the tools at the top of the window to edit your screenshot. You can crop, write, draw, highlight, erase, and add shapes.
- Save Your Screenshot:
- Click the disk icon at the top.
- Select a location to save your screenshot.
- Name your file and click Save.
- Alternatively, click the Copy icon to copy the screenshot to your clipboard for easy pasting into any app or document.
- Use the Snipping Tool Shortcut:
- Use the shortcut Windows key + Shift + S for future screenshots. Each icon on the Snipping Tool indicates a different screenshot type—Rectangle, Window, Full screen, and Freeform. Click the mode you’d like to use, then capture your screenshot.
Method 4: Use the Snipping Tool Shortcut (Windows 10 & 11)
- Prepare the View:
- Open the program or screen you want to capture, making sure any windows or items you don’t want on-screen are out of the way.
- Activate the Snipping Tool Shortcut:
- Press ⊞ Win + ⇧ Shift + S. Your screen will turn grey, and your mouse will turn into a crosshairs icon. The Snipping Tool will open at the top of the screen.
- By default, the shortcut will open Snipping Tool in Rectangle Snip Mode, allowing you to click and drag a rectangle around the area you want to capture.
- On Windows 10, you can select a different screenshot mode from the Mode menu. For example, to capture the whole screen, select Full-screen Snip. To capture a single window, select Window Snip.
- On Windows 11, you can select a different mode using the icons at the top: Rectangle (default), Window, Full screen (automatic), and Freeform modes.
- Press ⊞ Win + ⇧ Shift + S. Your screen will turn grey, and your mouse will turn into a crosshairs icon. The Snipping Tool will open at the top of the screen.
- Select the Area to Screenshot:
- Click and drag your mouse from the top-left corner of the area you want to capture to the bottom-right corner. Release the mouse button to capture the screenshot, which will be copied to your clipboard.
- If you selected a full-screen screenshot, you can skip this step.
- Click and drag your mouse from the top-left corner of the area you want to capture to the bottom-right corner. Release the mouse button to capture the screenshot, which will be copied to your clipboard.
- Paste or Save Your Screenshot:
- Paste the screenshot into any program that allows pasting photos (e.g., Paint, Word, email) by pressing Ctrl + V. The selected section of the screen will appear in your program.
- Alternatively, save your screenshot as an image file by pressing Ctrl + S, entering a name, selecting a save location, and clicking Save.
Method 5: Take a Screenshot of a Game or App
- Open the Xbox Game Bar:
- Press Windows key + G at the same time to open the Game Bar, which makes it easy to capture screenshots of games or any other open windows.
- Access the Capture Widget:
- Click the Widget menu (second icon from the left at the top of the screen) and then click Capture to open the Capture widget.
- Pin the Capture Widget:
- Click the pushpin icon on the Capture widget to pin it to your screen, preventing it from disappearing when you navigate away.
- Capture the Desired Window:
- Click the window you want to capture (e.g., web browser, game, document).
- Click the camera icon on the Game Bar to capture a screenshot of the active window, saving it to your screenshots folder.
- View Your Captures:
- Click See my captures at the bottom of the Capture widget to view all screenshots taken using the Game Bar.
- To unpin the Capture widget when finished, press Windows key + G to reopen the Game Bar, click the pushpin icon, and click anywhere on the screen.
- Click See my captures at the bottom of the Capture widget to view all screenshots taken using the Game Bar.
Method 6: Screenshot on a Windows Tablet
- Capture the Screen:
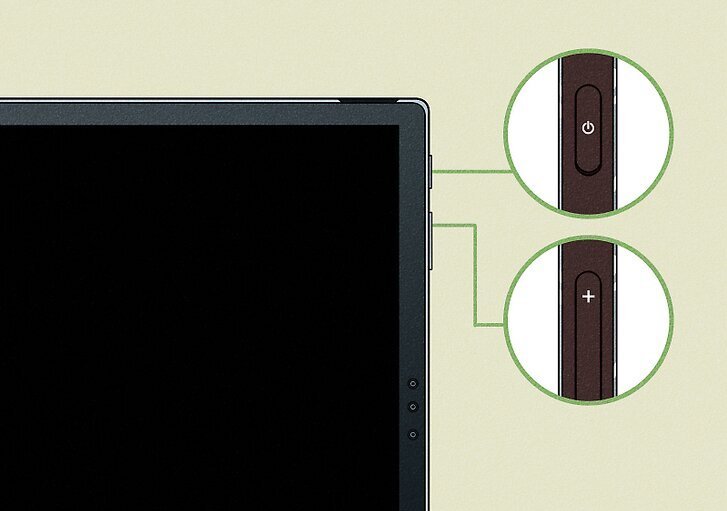
- Press and hold the Power and Volume Up buttons simultaneously. This will instantly capture the whole screen on devices like Surface Laptop, Surface Pro, Surface Book, Surface Go, or Surface Studio. The screen will dim momentarily to indicate a screenshot was taken.
- For Surface Duo 2, press and hold the Power and Volume Down buttons instead.
- Press and hold the Power and Volume Up buttons simultaneously. This will instantly capture the whole screen on devices like Surface Laptop, Surface Pro, Surface Book, Surface Go, or Surface Studio. The screen will dim momentarily to indicate a screenshot was taken.
- Access the Screenshot:
- Your screenshot will be stored in the Screenshots folder. Open File Explorer and navigate to Pictures → Screenshots to find it.
- For more control over your screenshots, use the Snipping Tool instead.
- Your screenshot will be stored in the Screenshots folder. Open File Explorer and navigate to Pictures → Screenshots to find it.
Q&A for How to Take a Screenshot in Microsoft Windows
What versions of Windows include the Snipping Tool?
The Snipping Tool is available in all versions of Windows since Windows Vista. This includes Vista, 7, 8, 10, Server 2008, and Server 2012. It is not included in Windows 7 Starter and Windows 7 Home Basic. If you are using these versions, you will need to use another utility for taking screenshots or use keyboard shortcuts.
How do I create arrows and circles after capturing a screenshot?
Load your screenshot into a photo editing software (e.g., Adobe Photoshop, Picasa, or even MS Paint) to edit your photo. You can then draw arrows or circles on your screenshot and save the image.
What is a screenshot?
A screenshot is a picture of what’s currently on your screen. The term comes from “to shoot a picture,” hence a picture of the screen is called a screenshot.
Where can I find the Print Screen key?
The Print Screen key is typically located along the top row of your keyboard, between F12 and Scroll Lock. On laptops, you might need to press the Fn key to use it, as many laptops share key functions. If you don’t have a Print Screen key, you can use the On-Screen Keyboard.
Where are my screenshots saved?
On Windows, the default save location for photos and screenshots is the Pictures folder. When you save your screenshot using Paint or the Snipping Tool, you can choose where it is saved, just like any other file or document.
How do I take a screenshot with a Samsung Galaxy Tab (Android)?
Hold down the power button and volume down button for a few seconds to capture a screenshot.
How do I take a screenshot on my Asus Transformer Pro?
It’s the same as on a Surface Pro or HP Notebook. Press Windows + Volume Up on a tablet, or press Windows + PrtScn on a keyboard.
How do I take a screenshot using my HP Pavilion entertainment PC laptop?
Windows comes with an application called “Snipping Tool.” Open it, press New, and then drag over the area you want to capture.
How do I take a screenshot if I have no Windows key and my Print Screen button is broken?
Try using the Snipping Tool. Type “snipping tool” into the search bar, and a program should appear. Follow the steps in Method 4.


Add comment